
Preparation
There is no pre-reading before this section of the course
Why is this important?
It is important to know what you should take to sea in order to look after yourself.
If the worst happens you should first consider how you can help yourself and then how to ask for help.
Below are a selections of links, resources and video that support the safety topics covered during your course.
Preparation – before you set out
Planning
Before going to sea in any craft the RNLI recommend you take the following easy actions whose initial spell out the words “It’s Wet”:
– Inform – tell other where you are going and when you are due back
– Training – make sure you know what you are doing
– SOS Device – carry a means of calling for help
– Wear a Lifejacket – you never know when you will need it
– Engine and fuel check – have you sufficient fuel and spare parts?
– Tides and weather – check the condition before heading out
RYA Safetrx
The RYA Safetrx app has now replaced the Coastguard Form 66 (CG66). The RYA SafeTrx app monitors your boat journeys and alerts emergency contacts should you fail to arrive on time.
RYA SafeTrx app is an app for both Android and Apple iOS smartphones that allows you to track your journey (in UK territorial waters) on your phone.
RYA SafeTrx app provides all recreational boat users, particularly dinghy cruisers, PWC users, RIB users, canoers, kayakers, wind and kite surfers and smaller boat users with an easily accessible and simple to use means that can inform HM Coastguard of their voyage plans and dynamic location in the event of distress.
This app is freely available to anyone who wants to be safer afloat. It is free to download and there is no charge to use it.
See the RYA Safetrx website for more details.
Personal Safety
The RNLI’s view on lifejackets and buoyancy aids it that they are “useless unless worn” and they encourage people to wear them at all times at sea.
The RYA’s view is summed up by the statement “‘wear a buoyancy aid or lifejacket unless you are sure you don’t need to”.
Below are link to article that highlight the difference between buoyancy Aids and Lifejackets and some of the considerations.
RYA: Lifejackets, when should I wear one?
Crewsaver’s “How to wear your Lifejacket correctly”
RYA: Guide to checking your lifejacket
All lifejackets should have:
- Manual Activation (for air only lifejackets)
- A whistle
- Reflective tape
Not all lifejackets have the following features (however you might want to consider them):
- Automatic activation (for air only lifejackets)
- Crutch straps
- Light
- Spray hood
Watch this video on Lifejacket Maintenance.
Video: additional information
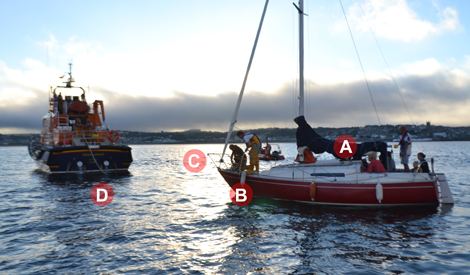
Tethers and jackstays
Watch this video to see some of the latest practical research on the use of tethers (safety lines):
Video: additional information
A tether should be attached to a boat using either a jackstay (running A to B in the picture) or strong eye bolt designed for the job.

Boat Safety
Crew Briefing
When you go to sea it is important that everyone onboard knows enough to keep themselves and the boat safe. It is also important that someone knows what to do if the skipper is suddenly unavailable for example if they fall overboard.
The amount of information you give your crew will depend on many things such as experience, the length of the trip and the type of boat. The checklists below have been put together by us over the last few years and a starting point (they are word files so that they can be edited and printed for your particular requirements).
Video: additional information
Your Engine
Whether you are on a sailing boat or a motor boat your engine is an important piece of equipment that can keep you safe. The checklists below have been put together by the RNLI to ensure you check all of the basics each time you go to sea.
The checklist below has been put together to go alongside our RYA Diesel Engine Course, it covers all the basic faults and how you should look after your engine both during the season and over the winter.
Inboard PzSC Diesel Engine Checklist and Fault Finder
Video: additional information
Killcord
Video: additional information
The RYA urges drivers to always wear a kill cord and to take these important safety steps – read the advice here.
Radar Reflector
A radar reflector can make a boat more visible to radar. This is particularly important for wooden and fibreglass which would have a poor radar signal.

Read more about radar reflectors in this RYA article.
AIS
Automatic Identification System or AIS is a system that transmits details of a vessel including position, identification, direction and speed. This can be displayed on a dedicated screen or on a chartplotter.
AIS can be used to aid collision avoidance, however should be used with caution as:
– not all vessel carry AIS
– even if a vessel has AIS it my supply incorrect information or be turned off.
– some information is manually entered and this might be incorrect.
For more details of the use of AIS see this RYA article.
Calling for help
If all else has failed and you need external help. This might be in the form of a simple radio message to a passing boat or the coastguard asking to assistance.
Distress
If a distress situation is such that:
“…in the opinion of the master, the vessel, vehicle, aircraft or person is ingrave an imminent danger and requires immediate assistance”
VHF
When in a distress situation if you are using a DSC Radio you would first press the “Distress Alert” button (red distress button). Your radio will automatically change to Channel 16 and high power.
If you are not using a DSC Radio you should manually change the radio to Channel 16 and high power. In both cases, you now transmit your distress call and message (the voice call). Below we highlight the procure step-by-step.
In both cases, you now transmit your distress call and message (the voice call). Below we highlight the procure step-by-step.
How to send the “alert” (pressing the red button)
This is the one time when you get to press the red distress button – to send a distress alert.
On any DSC radio you do this by:
– lifting the flap
– pressing the distress button once and release
– pressing the button a second time and holding down for 5 seconds.
The alert is a digital message which includes your MMSI number and your current position if you have programmed in your position or the radio is connected to a GPS.
If this does not make it clear, see the video below (DO NOT DO THIS ON A NORMAL RADIO UNLESS IT IS A DISTRESS SITUATION)
Video: skill
The message
Example message
Mayday, Mayday, Mayday
This is Po, Po, Po
Call Sign: ABCD9; MMSI 232004876
Mayday
Po
Call Sign: ABCD9; MMSI 232004876
My position is 50°49’.71N 001°15’.46W
Fire on board
Require immediate assistance
Eight persons on board
Abandoning to liferaft
Over
Remembering the order
Some people remember the order of the Mayday Message by remembering: MIPDANIO.
M – Mayday
I – Identification,
P – Position,
D – Distress type,
A – Assistance required,
N – Number of people on board,
I – Information (additional information that should be passed on),
O – Over.
For a more detailed explanation of how to use VHF radios see our Radio Training webpages.
 EPIRB
EPIRB
EPIRB stands for emergency position-indicating radio beacons. they are self contained radio beacons.
They can be activated either manually (by pressing a button) or automatically (when they float free of a sinking vessel). They should only be set off in a distress situation.
Once set off they transmit a coded message (not voice) to satellites which identify that you are in distress. If you EPIRB includes a built-in GPS it will also transmit your position, if not the satellites can triangulate your position to within a matter of miles within a few hours.
A second radio frequency is also used at close range to pin-point your position.
Note: Some older EPIRBs transmitted on different frequencies and are no longer monitored – check before you buy.
Registration
For your EPIRB to be of maximum use you should register it – in the UK that means registering with the coastguard.
See the coastguard website for more details of EPIRP registration.
Flares
Video: additional information
Once flares have expired (they normally have a 3 year life) they need to disposed of. You should contact the coastguard for information about how to dispose of flares in your local area. They should not been put in a normal rubbish bin or fired in a non-distress situation.
Laser Flares
There has been a lot of discussions in the last few years about how safe conventional flares are and whether to pros outweigh the cons.
Although there is no official standard or recognition of “safer” flares there are alternatives appearing on the market. See this test of a laser flare:
Video: additional information
SART
SARTs or Search and Rescue Transponders are also used in distress situations. When activated they send out a signal when they detect a radar pulse (9GHz), this signal is visible on a radar screen.
![]()
It will not identify the vessel but simple display the position of the SART with 12 dots trailing behind it on the screen, as the vessel gets closer the dots turn into dashes and finally as the vessel comes very close to the SART the dashes become concentric circles around its location.
At the sea surface it has a range of 5Nm however an aircraft at 1000m can see it from about 30-50Nm.
Other distress signals
There are many other distress signals including:
– Sending the Morse code group SOS (…—…) by light flashes or sounds.
– Showing flames on the vessel.
– Raising and lowering slowly and repeatedly both arms outstretched to each side
– Making a continuous sound with any fog-signalling apparatus
– Firing a gun or other explosive signal at intervals of about a minute
– Flying the international maritime signal flags N over C
– Displaying a visual signal consisting of a square flag having above or below it a ball or anything resembling a ball (round or circular in appearance)
Helping yourself
Liferafts
Read the BBC article on what’s you might find in a liferaft [BBC…]
Before getting into a liferaft:
- All crew should wear their lifejackets.
- All crew should wear warm clothing and TPA if available.
- Send a mayday.
- Tie the liferaft painter to the vessel.
- Collect a grab bag.
- Handheld VHF, EPIRB, PLB, Flares.
- Food and water.
Once in a liferaft, you should:
- Cut the painter (there should be a dedicated knife just inside the raft).
- Stream the drogue to add stability and minimise drift.
- Stay dry (there should be a bailer in the raft).
- Keep a lookout.
- Call for help (VHF, EPIRP) or have close at hand (flares, signalling mirror).
- Stay positive.
This video gives you a rough idea of what a liferaft will do when deployed.
Video: additional information
Helicopter
When operating with a helicopter:
– Make sure all loose items are either removed from deck or well tied down.
– You are all wearing lifejackets.
– Have a bucket ready to coil the highline into.
– Do not tie the highline to the vessel.
– Wear gloves if available.
– Follow instructions from helicopter.
– Do not use flares unless instructed and never rocket flares.
Video: additional information
Practising
In an emergency situation there is no time to practice or experiment. Therefore it is always good to practise key skills each season, such as practising a MOB recovery with a fender at the start of each season.
In 2011 Yachting Monthly magazine took this idea to the extreme and in a controlled manner destroyed a yacht testing out emergency procedures. Below is a selection of the videos they published:
Sinking
The principal here is that a hole was made in the boat, below the water line and different methods of closing up the hole where practised.
It is worth noting that the hole does not have to be very big (even with a stationary boat) for the water to come in at a rapid rate.
Part 1:
Video: additional information
Part 2:
Video: additional information
Dismast & Jury Rigging
In these series of videos they look at what can happen if you loss your mast and how you could help yourself by constructing an improvised rig and sails from the remains.
Dismasting
Video: additional information
Jury Rig
Video: additional information
Capsize
The team capsize a boat in a controlled environment to investigate the effects on the boat.
Video: additional information
Rudderless Sailing
Which methods work and which method don’t when you loss your main rudder.
Video: additional information
Fire
Fire is one of the scariest things that can happen onboard, find some idea about how to deal with a fire on a small boat.
Video: additional information
Man Overboard
What this video from Motor Boat & Yachting
Video: additional information
Towing
If you lose the ability to propel yourself at sea your only option left is to get a tow. This does not need to be from the lifeboat however in some cases you might need there help.
There are two methods of towing, they both are useful in different situations.
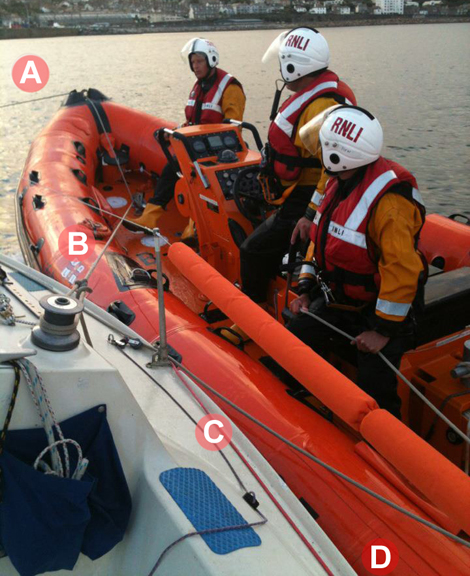
Long Tow
As the name suggests, this is when the boats are a long way apart with one boat behind the other. This is useful in open water when you don’t want the two boats to come into contact.
The key thing to get right here is how the tow line is attached to your boat, whether towing or being towed. Standard deck cleats (“B” in the photo below) on most modern boats are often not up to the job.
The strongest point on most yachts are the genoa winches “A” and a loop of rope from the winch or winches on one side around the bow and back to the winches on the other side will give a strong anchor point for the tow line in most cases. This loop may act as a reinforcement for the bow cleats “E” or if the bow cleats are weak they might miss then out altogether.
The main tow line “D” (which in the case of a lifeboat will be up to 50mm in diameter) can then be attached to the towing strop with a bowline “C”.

Alongside tow
This is with the two boats lashed alongside each other and is good for retaining full controlled of the boat being towed, for example when coming into harbour.
It is important that the two boats are firmly held together using four lines so that full control can be maintained.
In the photo below “A” is a line going bow to bow; “B” is a spring which in forward motion will take most of the stain (note, here how this line is run from the strong bow cleat of the lifeboat onto a winch on the yacht); “C” is the second spring that would take the bulk of the strain in reverse and “D” is a stern to stern line (out of shot).
In this photo the two boats are of a similar size and it is appropriate to lash the boats side by side. If the boat being towed is large that the tow it will be necessary to lash the tow boat towards the stern of the boat being towed.

For more information read this PBO article about being towed by a lifeboat.
Running Aground
Video: additional information
Environment
The Green Blue
Learn more about living in harmony with the marine environment from Green Blue.
Links
Safety Advisory Notice
The RYA’s annual Safety Advisory Notice
RNLI Training – Lifejackets
This is a link to the online version of the RNLI Training console.
RNLI Training – Liferaft
This is a link to the online version of the RNLI Training console.
Fire Onboard
An RYA article on Fire onboard boat.
Carbon Monoxide
The RYA’s advice on Carbon Monoxide
Sailtrain
More information about distress signals.
Storm Jib
In times of extreme wind it is good to have a Storm Jib but more important to know how to use it. Start to discover how with this Sailing Today article.
Check your understanding

Check your knowledge of the basics using this quick self-marking test.
Open the quiz
Progression
Now you know the basics of safety at sea, use this knowledge to inform you decisions when going to sea. This is particular important when Passage Planning.
Feedback
The content of these pages is put together in good faith and is constantly evolving. It is possible that errors exist within this content. If you spot an error or would like to add anything to these pages please contact use via email.
Reading the content of these pages is not a substitute for completing a RYA Shorebased course or similar.
